HOME | DD
 Labean — Annie's Mouth 5

Published: 2013-05-14 17:48:27 +0000 UTC; Views: 37928; Favourites: 255; Downloads: 465
Redirect to original
Description
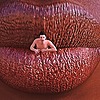
Ok these are the last test renders I'm doing before getting back to work on my stories. I've messed about enough with my PC and reality. These 5 pics were all rendered using Reality 2.5 in Lux render. Posing done in Daz Studio. Each one was rendered for about 90mins each, apart from the last which was rendered overnight, can't tell much of a difference although there is one.Just to let you guys know that although I will be using Reality and Lux-Render for the occasional picture, I will be sticking with 3delight for my stories, it's much more productive.
Related content
Comments: 27

👍: 0 ⏩: 0

I totally love that he's climbing in on his own!
👍: 0 ⏩: 0

I would totally climb into that mouth if it were me. Nice worl.
👍: 0 ⏩: 1

There was a 6 but it didn't turn out quite the way I wanted so I never released it.
👍: 0 ⏩: 1

please do it. It is beautiful.
👍: 0 ⏩: 1

or uf you don't want to release it send it to my email - petr-bezruc@email.cz
pleeeeaaaaaase
👍: 0 ⏩: 0

Hi,
I have DAZ studio too. What add ons do you have that allows you to make such great pictures? Also do you do trades?
Mark B.
👍: 0 ⏩: 1

I don't do trades, I've never needed to. As for my addons, in this particular set, I used Reality2 as the render engine. But I'm more than happy using 3delight (The inbuilt Daz3D render engine). Getting good images is all about lighting. You have to think of ever scene like a movie set and light is as such. There is not quick method as every scene is different. A good place to start is the 3-point light method.
The 3 point light method is using, you guessed it 3 point lights. Your main light, which should be the brightest and cast the shadow and placed to the left or right side of the camera, the 2nd, the fill light, which should be placed on the other side of the camera with the same tilt and angle as your main light. The fill lights job is to "fill" the light where the shadow will fall from your main light, because of this you want this light to be weaker than your main light, I find half the intensity is a good place to start but it depends on the scene. Also you want the fill light to have a bit of colour in it, for human models I find an orange colour works well, but again, it depends on your scene. The final light is your back light which should point behind your subject and towards the camera, it should be a low intensity light about a quarter intensity of your main light and a light blue colour works well. The job of the back light is to stop you getting dark shadows at the edges of your models but not interfering with your main and fill light.
What I have wrote above is a very simple light set-up which should give you great pictures for simple scenes. I've tried to explain what each lights job is, which hopefully makes it easier to change certain things and know why you are changing them.
👍: 0 ⏩: 0

is this Shingeki no Kyojin related..... *i'm sorry I'm sorry*
👍: 0 ⏩: 0

Heh, yes, her smile is very telling here. Nice work!
👍: 0 ⏩: 0

I cant wait to see more of these. A great series so far. Now I think I'll go explore your gallery again XD
👍: 0 ⏩: 0

My imagination is on over time and I can imagine what happens next.
Your artwork is brilliant.
👍: 0 ⏩: 0

Such a brave little man! Incredibly sexy pic!!
👍: 0 ⏩: 0

Just an awesome set! You do a very good job in telling a bit of a story with only facial expressions.
Out of curiosity, about how long do your renders take when you're using the 3Delight engine?
👍: 0 ⏩: 1

I did one of these pics with 3Delight using Uberenviroment2 with a couple of point lights 1 with soft shadows and it took about 20 minutes.
My renders have sped up a lot now due to me actually using the 12GB of Ram in my system, that I have had in it for 3 or so months. I used to have a 32bit OS, which I didn't know only uses up to 4gb of Ram so I had 8gb doing fuck all. I have a 64bit OS now.
👍: 0 ⏩: 1

Mm, I think I've only got 4GB on my own rig, but I intend to upgrade that eventually (I've already got a 64-bit system). 20 minutes sounds about right, my own renders tend to be around 20-30 minutes for bigger scenes. I'm not using anything other than default shaders right now though (the majority of the render time for my stuff is just a result of the hair models and the raytraced shadows combined).
I'm guessing you usually use Uber shaders for your regular renders, then, or at least UberEnvironment?
👍: 0 ⏩: 1

I do yes, I'm trying to stray away from UberEnviroment, it's almost like cheating, but sometimes I need it if only for background shading. If I don't use it the background can look very flat, as you don't get that darker shadow in corners of rooms where the 2 walls meet.
👍: 0 ⏩: 1

Mm, I need to experiment with it some more; the last time I used UberEnviroment, I think I just ended up with a super-bright picture (my usual lighting setup probably has too many lights for it).
I usually "cheat" myself, I do a lot of adjustments in the postwork; the focal blur in some of my images is added afterwards in Photoshop (duplicated layer with a strong blur applied to it, then I just use a layer mask to control which parts are blurred). Same goes for the mouths I render, I only use one shadow-casting light, so inner mouths tend to be too bright; I do that manually as well.
So long as you're still the one doing the work and creating the image (not stealin' stuff or tracing or whatever), the results are more important than the process!
👍: 0 ⏩: 1

If you're getting a washed out scene using UberEnviroment2, you have 2 options, change the intensity or the colour of the uberEnviroment2 light, I usually change the colour to either a dark gray or if you want a more early morning or early evening sort of look, change it to a flesh colour. But you have to play about with it.
👍: 0 ⏩: 1

Thanks, I'll mess around with it sometime. Default shaders and lights have been doing well for me thus far, but I'm definitely interested in exploring what other options I've got.
👍: 0 ⏩: 0


